

Quick Installer Summary
Over 85% of concealed leaks on exposed bar mixer showers are caused by torsional pipe flex, misaligned pipe centres, or depth discrepancies when tightening 3/4" BSP bar union nuts onto 15mm copper supply lines. Flimsy independent surface brackets allow the copper pipe to twist inside stud wall cavities when the mixer nuts are torqued to 35–45 Nm, crushing the compression olive out-of-round and causing slow catastrophic weeping inside plasterboard. Installing a heavy-gauge galvanized steel 150mm Shower Fixing Plate Kit (SPLFF-15) locks both hot and cold pipe centres at an exact 150.0mm (+/- 0.5mm), eliminates wall-cavity pipe flex, and guarantees a 90° perpendicular face for leak-free, gasket-seated bar valve installation.
The Anatomy of a Hidden Bar Mixer Shower Leak
Exposed thermostatic bar mixer showers are the UK's most popular bathroom installation. They offer sleek aesthetics, precise thermostatic water temperature control, and simple surface maintenance.
However, behind the tiles lies a hidden structural challenge: a heavy brass bar mixer valve (weighing 1.8kg to 2.8kg) suspended entirely from two 15mm copper supply pipes.
When an installer attempts to support a bar mixer using independent plastic brackets or two freestanding wingback drop-ear elbows fixed to studwork, the installation is vulnerable to mechanical leverage. Every time an end user adjusts the water flow, rotates the temperature knob, or leans on the riser rail, mechanical torque is transferred directly into the compression joints behind the finished tiled wall.
The 4 Primary Causes of Behind-Tile Bar Shower Leaks
1. Pipe Centre Misalignment (The 150mm Rule)
Standard UK bar mixer valves are manufactured with fixed female union nuts spaced at precisely 150mm centres (typically with +/- 1mm of tolerance). When hot and cold copper pipes are brought through a stud wall independently, plasterboard fixing and tile adhesive shrinkage frequently shift the pipes out of parallel (e.g. 148mm or 152mm).
When the installer wrenches the chrome mixer nuts onto the wall threads, the union nuts cross-thread or force the brass fittings against the rubber sealing washers at an angle. The washer is pinched, leading to a slow drip that tracks along the copper pipe inside the cavity wall.
2. Torsional Joint Twisting During Final Tightening
Tightening 3/4" brass union nuts to establish a watertight seal against a flat neoprene or silicone gasket requires approximately 35 to 45 Nm of torque. Without a rigid steel bracket spanning both pipes, the rotational torque twists the copper tail within the stud wall. If compression fittings are located behind the wall, the olive shifts inside the taper, destroying the metal-to-metal seal and initiating a concealed leak.
Eliminate Wall Leaks with the 150mm Shower Fixing Plate
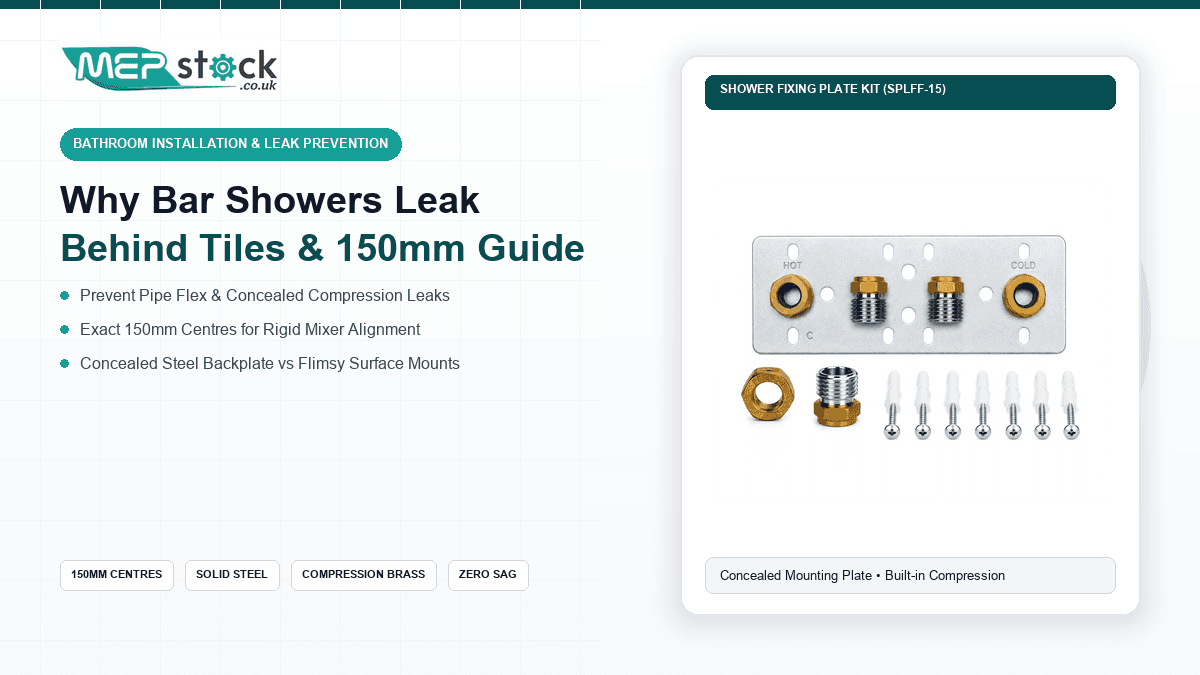
The SPLFF-15 kit features a heavy-gauge pre-drilled steel mounting plate with integrated brass compression elbows. Locks pipe centres at an exact 150mm and provides rigid studwork anchoring before tiling.
View Shower Fixing Plate Kit (SPLFF-15) →3. Non-Perpendicular (Crooked) Pipe Tails
If the copper pipe protrudes from the wall at an 88° or 92° angle rather than a crisp 90.0° perpendicular alignment, the face of the brass wall union will not seat flush against the rear of the mixer valve. Installers often attempt to compensate by over-tightening the nut, which distorts the brass threads and splits the sealing washer.
4. Tile Cutout Edge Clamping & Grout Degradation
When holes in the tiles are cut too tightly around the pipework, the chrome shrouds clamp against the tile face rather than bottoming out on the brass fitting. When tile grout degrades or movement occurs, water spraying off the shower bather migrates behind the chrome cover collar directly into the unsealed wall cavity.
Concealed Steel Backplate vs Surface-Mounted Wall Brackets
Step-by-Step Guide: Fitting the SPLFF-15 Fixing Plate Correctly
- Timber Noggin Installation: Secure a solid 4x2 timber noggin between the vertical wall studs at the desired shower valve height (typically 1,000mm to 1,200mm from finished shower tray floor).
- Anchor the Steel Plate: Fix the SPLFF-15 mounting plate to the noggin using heavy-duty wood screws through the pre-punched countersunk holes. Use a spirit level to verify absolute horizontal alignment.
- Rough-in Copper Pipework: Connect hot (left) and cold (right) 15mm copper pipework into the rear compression inlets of the plate. Tighten the brass compression nuts onto the copper olives with two spanners, ensuring the pipe bottoms firmly inside the fitting socket.
- Pressure Testing Before Boarding: Always pressure test the cold and hot lines to a minimum of 6 Bar (or 1.5x working mains pressure) before fitting moisture-resistant plasterboard or tile backer boards.
- Boarding & Tiling: Cut neat circular holes in the cement board or plasterboard around the protruding 3/4" male threaded brass bosses. Tile directly up to the edge of the threaded boss, leaving a 2mm expansion gap for sanitary silicone sealant.
- Bar Mixer Mounting: Thread on the decorative chrome shrouds, insert the rubber/filter mesh washers into the bar mixer nuts, and hand-tighten onto the threaded plate outlets before tightening one full turn with a smooth-jaw spanner.